WordPress is the content management system (CMS) most used in the world. WordPress is used by 64% of all the CMS, the 43% of all websites in the web.
WordPress is also Open Source, what means is free! and mainly oriented to the creation of blogs, content websites and eCommerce. This famous CMS is based on PHP to execute the code, and MySQL as database to store the content.
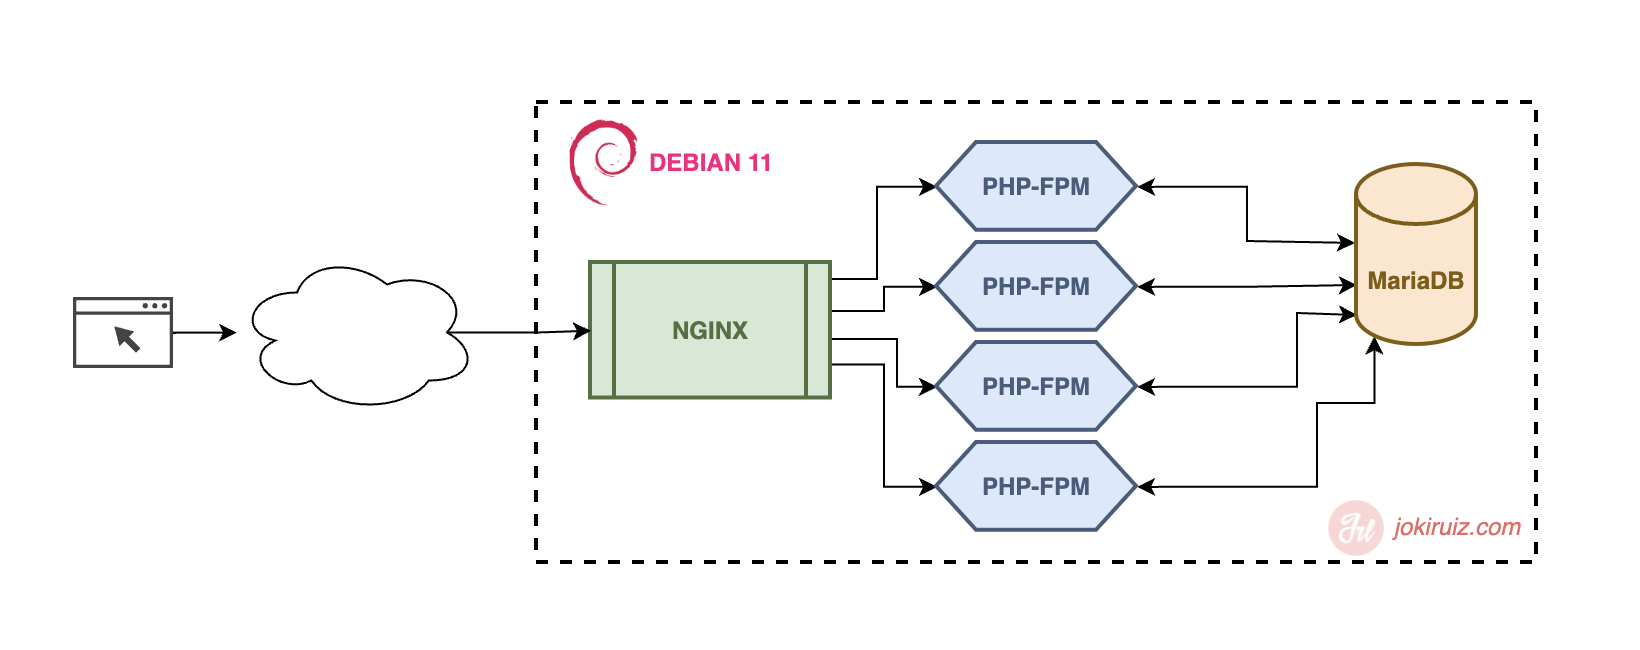
What we will see next will be the installation of WordPress on a server in Debian 11, using as HTTP server/service Nginx.
Installing Nginx
NGINX is a powerful, lightweight and flexible open source HTTP server that has gained popularity in recent years and is now the main server interface powering some of the most heavily trafficked websites nowadays.
What makes it so fast and reliable is the fact that it uses the same modular design as Apache, but has a different approach to web sockets, using an event-driven asynchronous architecture that doesn’t spawn processes as fast as it receives requests. and it also uses simple configuration files.
First of all, we update the system to make sure that our installed packages are up to date:
apt update
apt upgradeNote: If you are seeing this error (or similar):
Cambio de medio: Inserte el disco etiquetado como
 «Debian GNU/Linux 11.6.0 _Bullseye_ - Official amd64 DVD Binary-1 20221217-10:40»
en la unidad «/media/cdrom/» y pulse [Enter]
Ign:1 cdrom://[Debian GNU/Linux 11.0.0 _Bullseye_ - Official amd64 DVD Binary-1 20210814-10:04] bullseye InRelease
Err:2 cdrom://[Debian GNU/Linux 11.0.0 _Bullseye_ - Official amd64 DVD Binary-1 20210814-10:04] bullseye Release
Please use apt-cdrom to make this CD-ROM recognized by APT. apt-get update cannot be used to add new CD-ROMs
You need to update your apt list:
nano /etc/apt/sources.listAnd comment by adding a «#» a begging of the line to
#deb cdrom:[Debian GNU/Linux 11.6.0 _Bullseye_ - Official amd64 DVD Binary-1 20>Then we will install the Nginx HTTP server using the following command:
apt-get install nginxOnce the installation finishes, we can start the HTTP server using these comands:
systemctl start nginx
systemctl enable nginx
And check the status using:
systemctl status nginxInstalling PHP
WordPress is written in the PHP programming language, when Nginx receives a request, it sends it to WordPress, so it has to be able to execute PHP.
Therefore we need to install PHP and PHP-FPM packages.
apt-get install php php-mysql php-fpm php-curl php-gd php-intl php-mbstring php-soap php-xml php-xmlrpc php-zipTo enable the PHP-FPM service, we need to use these commands:
systemctl start php7.4-fpm
systemctl enable php7.4-fpm
And check the status using:
systemctl status php7.4-fpmInstalling MariaDB
WordPress uses MySQL as database to store the data and content. MariaDB is one of the most popular open source relational databases. It’s made by the original developers of MySQL and guaranteed to stay open source. It is part of most cloud offerings and the default in most Linux distributions.
It is built upon the values of performance, stability, and openness, and MariaDB Foundation ensures contributions will be accepted on technical merit.
Therefore we are going to install MariaDB server and client packages.
apt install mariadb-server mariadb-clientAnd check the status using:
systemctl status mariadb
systemctl is-enabled mariadb
Now we need to make our MariaDB installation secure by running the mysql_secure_installation script that comes with the MariaDB package.
mysql_secure_installationAfter executing the scripts, we will have to answer some questions:
- Root password: YES (and set one complex and secure password)
- unix_socket authentication: NO
- Change Root Password: NO
- Delete anonymous users: YES
- Disallow root login remotely: YES
- Delete test database: YES
- Reload privilege tables: YES
Create a Virtual Host in NGINX for WordPress
Now it’s time to create a basic virtual host for the WordPress website for the NGINX server. First of all, we are going to create a WordPress server configuration file.
nano /etc/nginx/sites-available/wordpress-site.confAnd enter the next content (replace mysite.com, by your domain)
server {
        listen 80;
        listen [::]:80;
        root /var/www/html/mysite.com;
        index index.php index.html index.htm;
        server_name mysite.com www.mysite.com;
        error_log /var/log/nginx/mysite.com_error.log;
        access_log /var/log/nginx/mysite.com_access.log;
        client_max_body_size 100M;
        location / {
                try_files $uri $uri/ /index.php?$args;
        }
        location ~ \.php$ {
                include snippets/fastcgi-php.conf;
                fastcgi_pass unix:/run/php/php7.4-fpm.sock;
                fastcgi_param SCRIPT_FILENAME $document_root$fastcgi_script_name;
        }
}
Finally, link this virtual host to the enable folder:
ln -s /etc/nginx/sites-available/wordpress-site.conf /etc/nginx/sites-enabled/.Restart our NGINX server, and check that we don’t have errors.
systemctl restart nginxInstalling WordPress
First, we need to put our WordPress files on /var/www/html/mysite.com
And then, correct the files and folders permissions so Nginx can access and edit some files
sudo chown -R www-data: /var/www/html/mysite.com/
sudo chmod -R 755 /var/www/html/mysite.com/
Then we need to set the user and password of the database to WordPress. To do this, we can set it via the WordPress installation, o editing the wp-config.php file
DO NOT use root password for this, create a new password just for WordPress database. First we are going to create a database to store our WordPress data and content:
mysql
MariaDB [(none)]> CREATE DATABASE mysite;
Then we will create a user with permissions just for this new database «mysite»
MariaDB [(none)]> CREATE USER 'mysite_user'@'localhost' IDENTIFIED BY 'here_you_put_password';
MariaDB [(none)]> GRANT ALL PRIVILEGES ON mysite.* to mysite_user@'localhost';
MariaDB [(none)]> FLUSH PRIVILEGES;
MariaDB [(none)]> exit
And then we can add this information to wp-config.php or WordPress installation page
